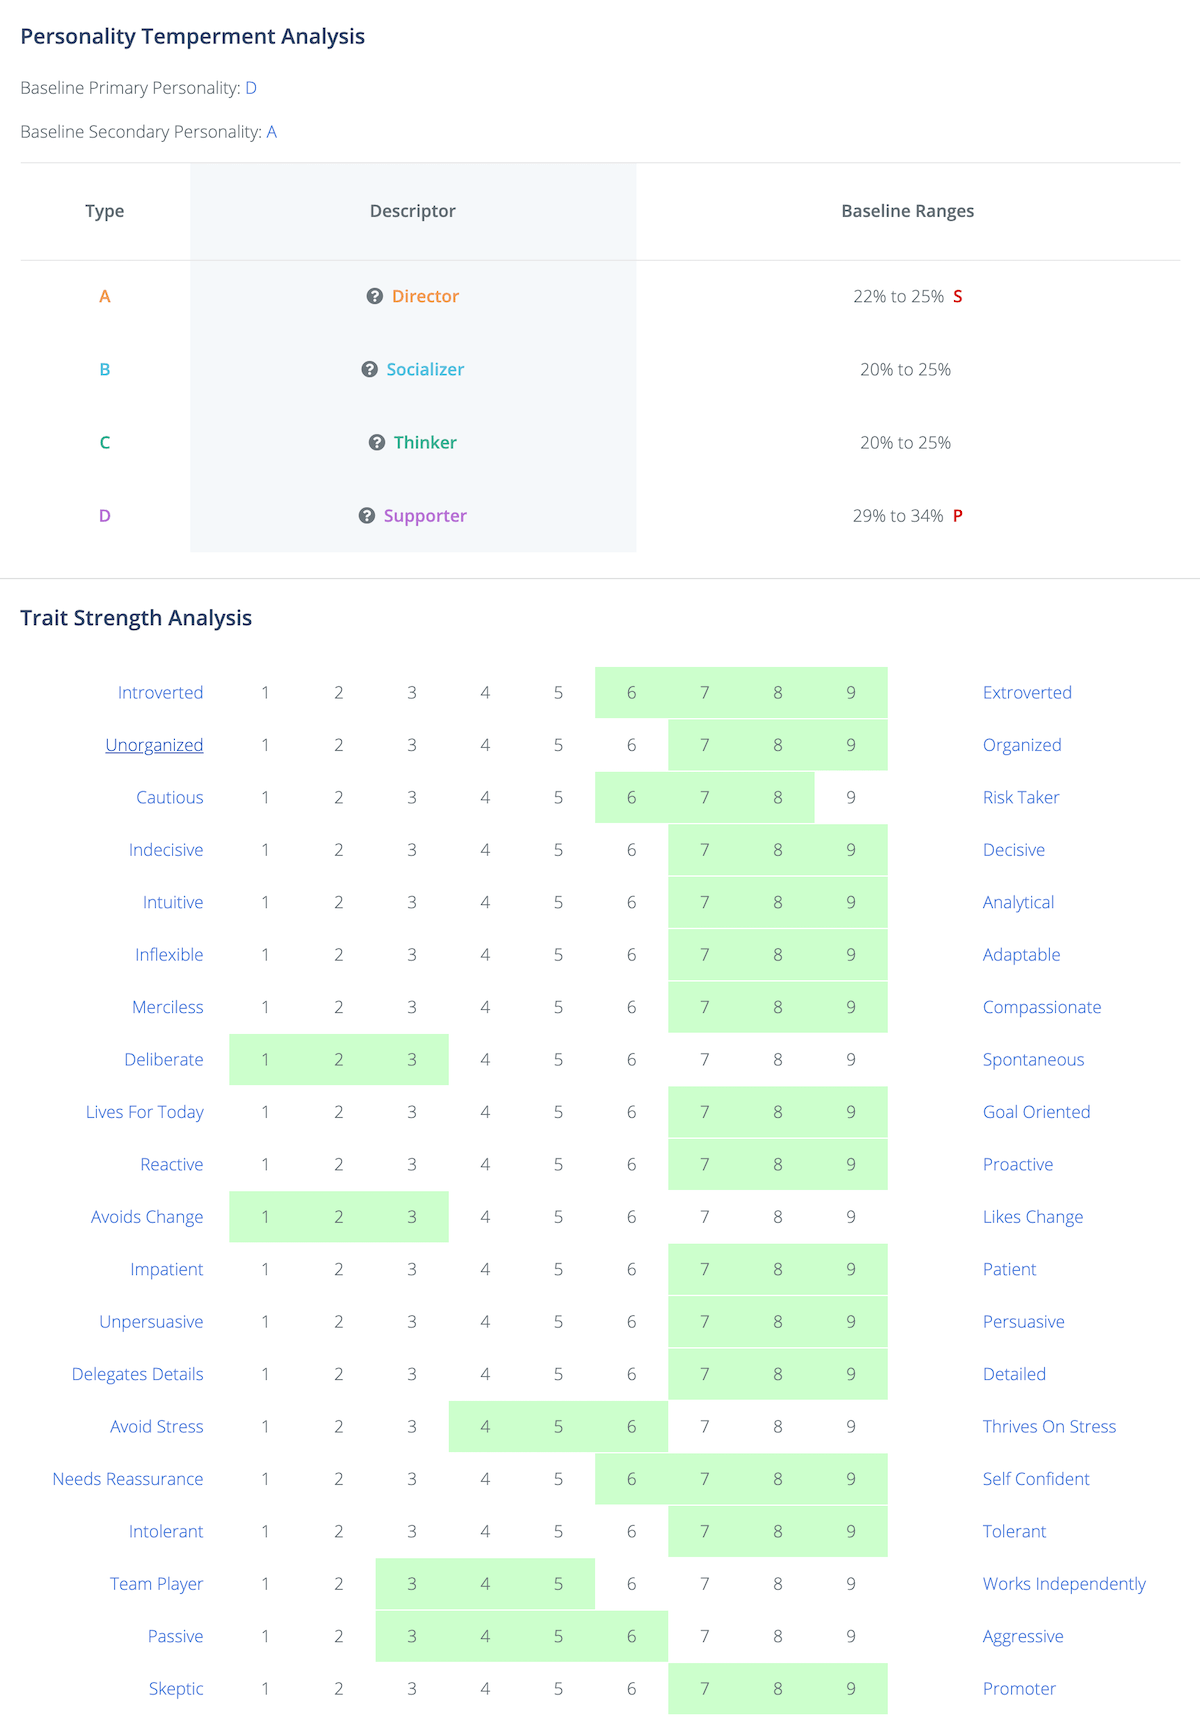
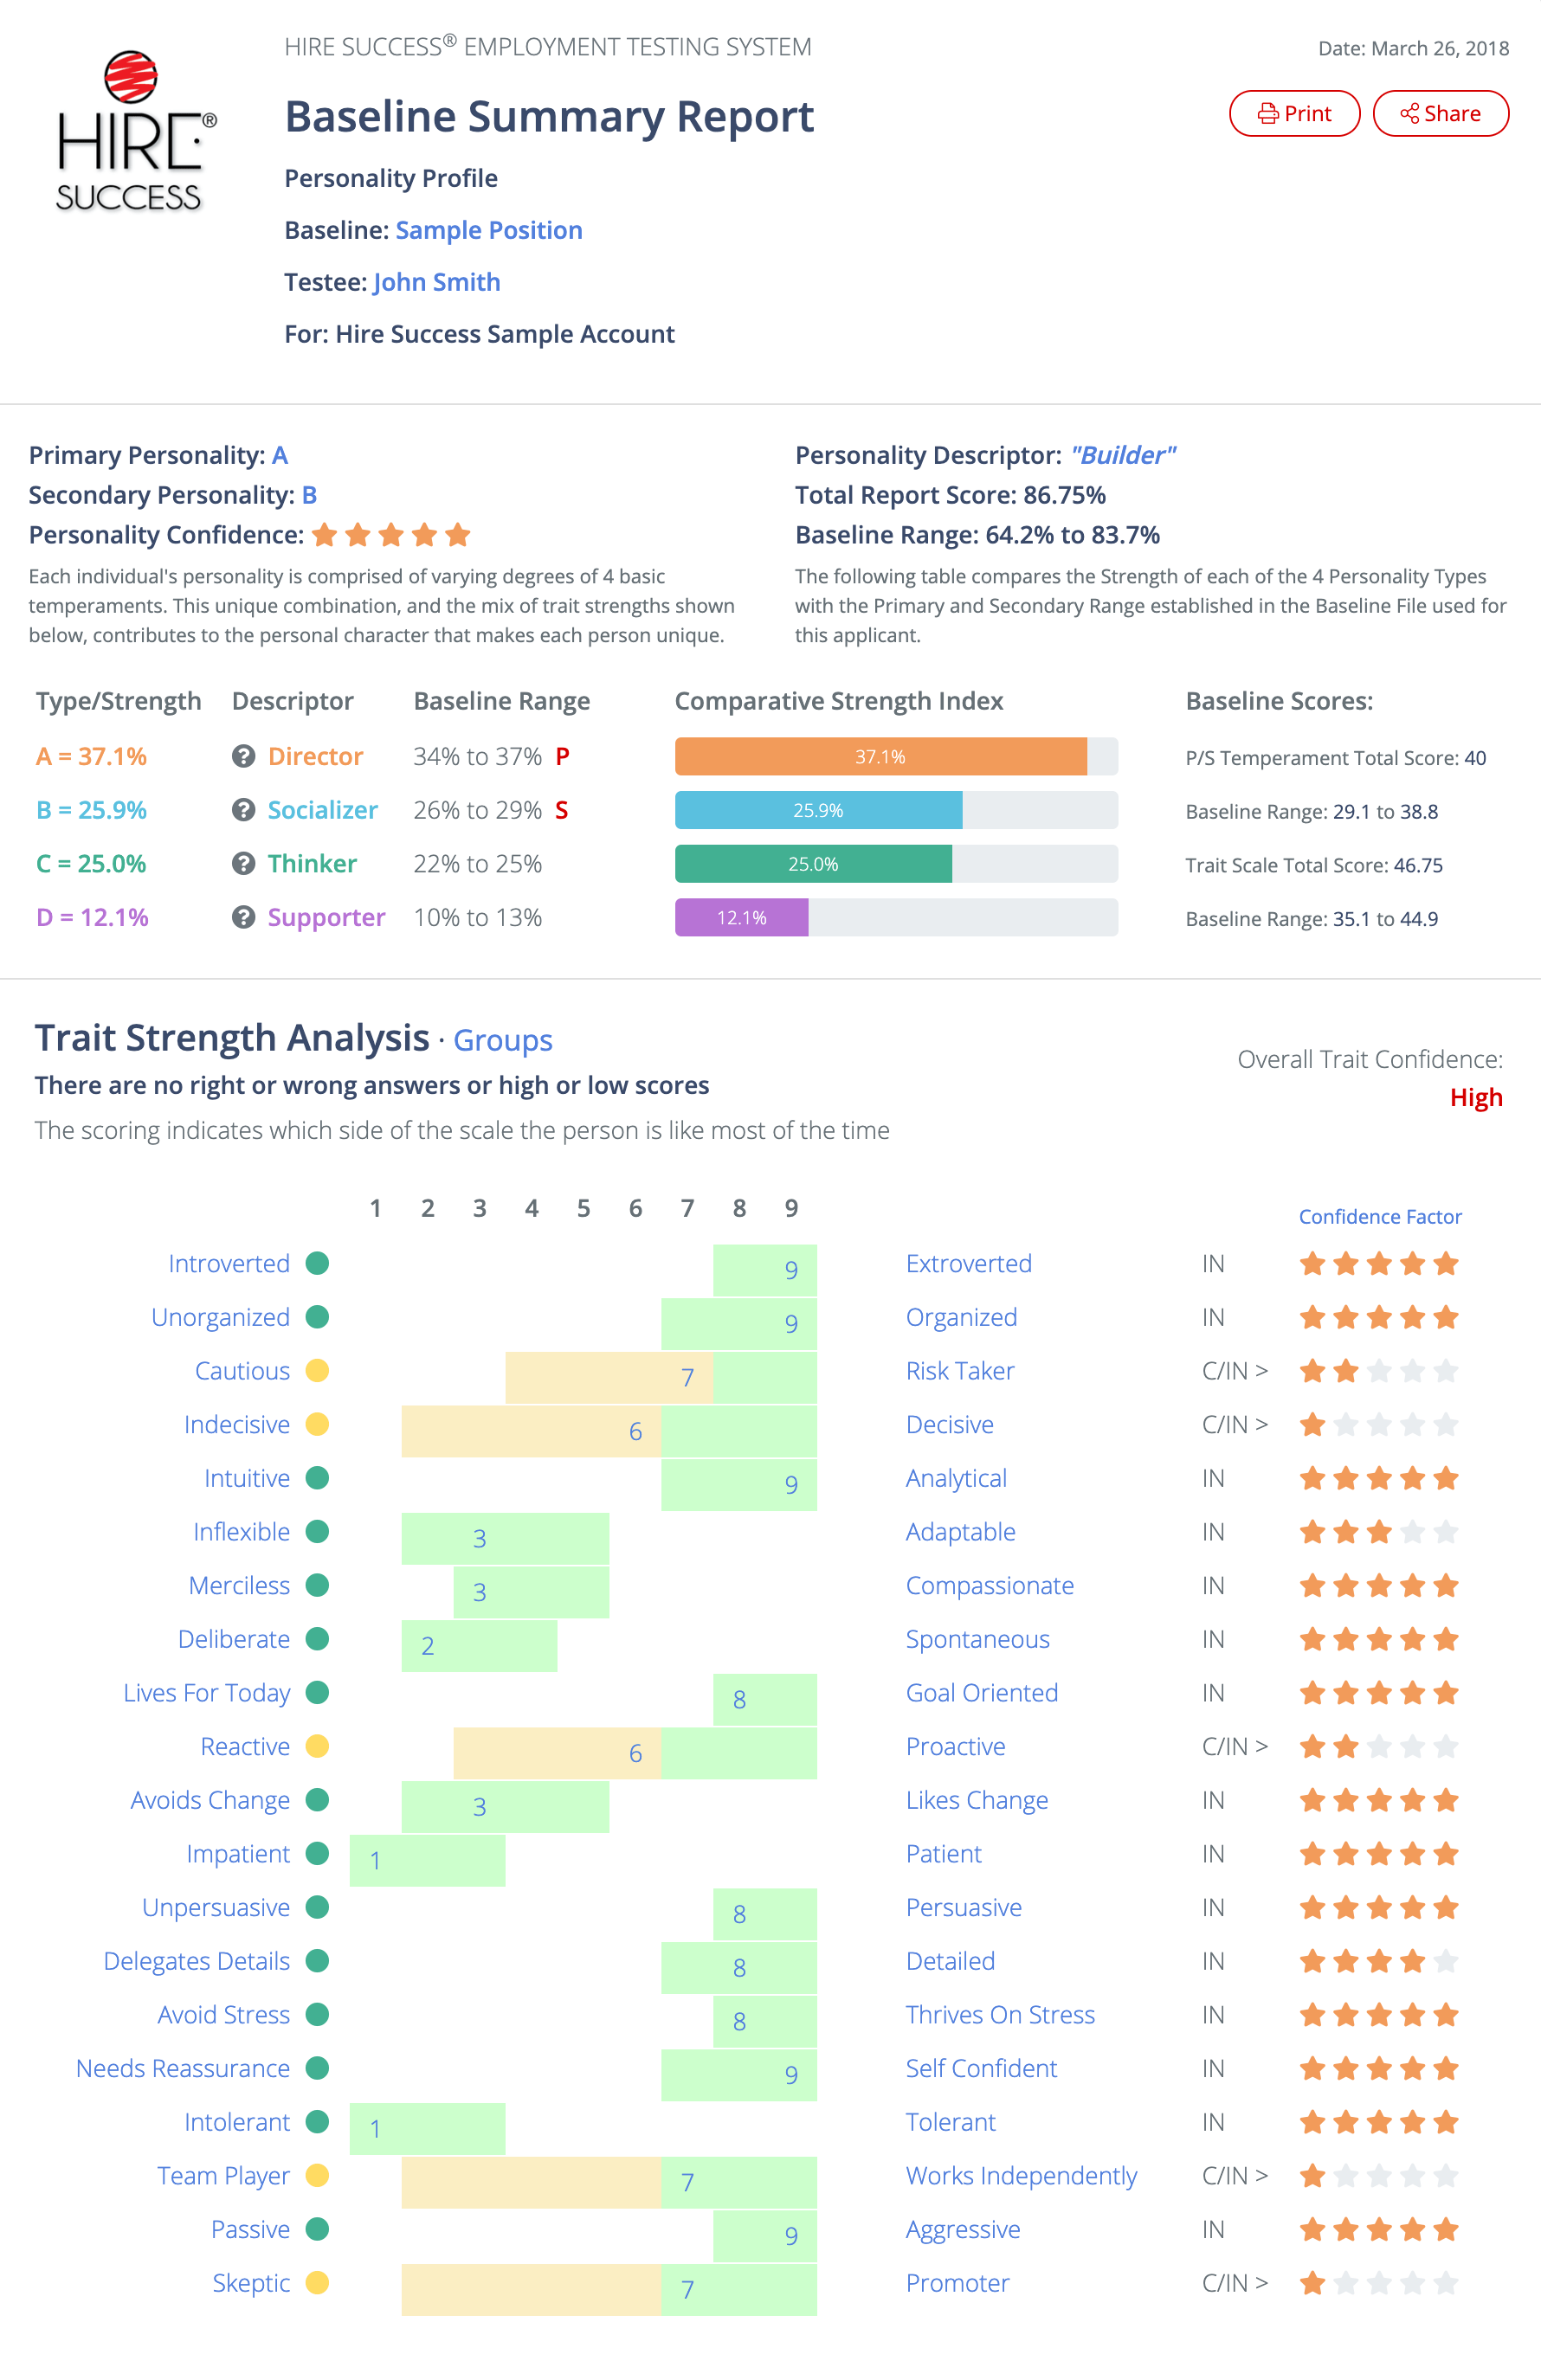
TUTORIAL: Create a New Baseline File

  
Previous Top Next

BASELINE TOOLBAR:  

Baseline Toolbar

Creating a New Baseline is easy.  A blank Baseline ("Default.bsd") was created for you when you installed the Hire Success System.   You may use this Default Baseline, or create a New one.  To create a New Baseline, choose the "New" Button from the Baseline Toolbar or use the "File" menu, then "New Baseline", or you can us a Shortcut and press teh F7 Function key at any time. Try each of these now so you will be familiar with the options and use the one most comfortable for you.

Create New Baseline Database

We will create a New Baseline called "Sales Representative" in the "Description" field, and use "SalesRep" in the "Save As File Name" field.  Note, DO NOT put any file extension on the name as the System will automatically add the ".BSD" file extension for you si the system will recognize the Baseline File.  When you have completed this screen, press the "OK" button and the New Baseline File will be created and will be OPEN for your Immediate use.


CREATE A BASELINE IN 3 EASY STEPS:

3 Steps on Toolbar   

Although the "Baseline Manager" Menu has all of the menu items you need to create a Baseline, the easiest, and most convenient way, is to use the "3-STEP" Baseline Toolbar (see example above).  It is as easy as pressing the 3 Toolbar Buttons, completing the information and the Baseline is finished in seconds.  Let's take the Steps together...

Step 1  Press the Step 1 Button on the toolbar (see example on left).  This will take you again to the Folder you last used to find Reports saved that you received by email.  If you are going through this Tutorial, you will still probably be in the "Sample Reports" folder.  If you do not see any Reports to choose from, navigate to the C:FilesSuccessReports folder and you will find the 26 Sample Reports provided with the System.

graphic 

Choose all of the Reports with the First Name starting with "A" and the Last Name starting with

"B".  There should be 5 Reports in the folder like this, e.g. "Adam Baker".  These 5 are similar personalities and would be a representative sample like you might select from similar employee's Reports where each of the employees represents one of your "best" people in a particular job.

To select multiple files at one time, hold the Control Key ("Ctrl") down while you click the names with your mouse.  Clicking a file name a second time while holding the Ctrl key will un-highlight the name.  Once you have highlighted and selected all 5 Sample Reports, press the "Open" button.  All 5 of the Reports you selected will be "read" by the Hire Success System and the Employee's data saved in the open Database.

NOTE: The Baseline Database is separate from the Campaign Database.  There are always 2 Databases open at once (one of each).  Adding Reports to one does NOT add them to the other.

Step 2 Button  Next, press the "Step 2" button (like the example on the left).  Within seconds, the System will calculate all of the Data and ask you to Confirm overwriting the Database.  This may ask you up to 2 times as it evaluates and saves data.  Respond by pressing the "Yes" button each time unless you do not want the data updated and saved.  All of this happens very quickly, so don't be surprised if you wonder what to do next... the system is finished and waiting for you to go to Step 3.

Step 3 Button  Finally, click the Step 3 Button to View or Edit the Baseline Data.

graphic

A screen similar to the one above will appear.  This allows you to view or edit any of the Baseline Data as may be required from time to time.  For more information on why and when you may want to edit the Baseline Data, see: "EDIT BASELINE DATA ".

For now, leave the data as-is so we can use it in the next steps of the Tutorial as we Print A Baseline Report .


            NEXT:                           TUTORIAL: Print a Baseline Summary Report

            PREVIOUS:                  Create/Edit a Campaign


Hire Success is a Registered Trademark of Decision Support Technology, Inc.
and is Registered in the United States Patent and Trademark Office.

Copyright 1999-2008, Decision Support Technology, Inc.  All Rights Reserved.